Digital Cameras, Understanding The Basics
The demand for digital cameras is growing at a stupendous rate. A number of factors have played a part in making digital cameras popular among people of all ages. Shooting sharp and crisp images is no longer a problem. The time when you had to pay several dollars for a film roll that allowed you to shoot only 36 images are over. Many photography lovers from the earlier generation, stuck to their old film cameras. Each of them found reasons for doing that, most reasons centered around some (imaginery?) qualities which a digital photograph could not deliver! But that has changed now with conventional film camera makers also joining the digital race. Nikon, Fuji, Kodak, Canon and Olympus have all started producing digital cameras.
Taking neat photos is a breeze today. Just get your digital camera home, spend a few moments with the instruction manual, shove a storage card in and place the batteries in the slot provided. Now all you need to do is shoot, shoot, shoot. In case we forgot to mention, place the camera in 'Auto' mode and then all you need to do is excercise your finger to push the shutter switch down. So are the days of the professional photographer over? Has creativity been compromised with all this express image taking? In this interesting article we are going to talk about a few things that can get you better images with your digital camera.
Auto mode: Most digital camera users start their experience with digital photography with the camera in Auto mode. This is a good way to start your adventure but, the problem is that most users never go beyond the Auto mode! When you put your digital camera in Auto mode, the camera does the focusing, sets the shutter speed and the aperture too. We will come to the meanings of those terms below.

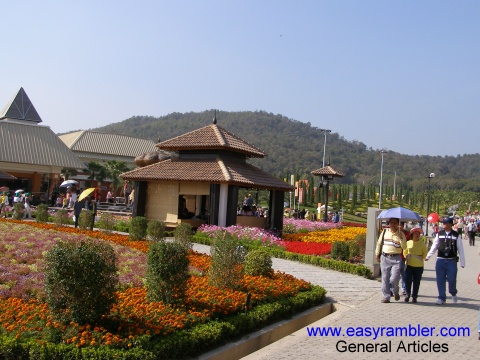
The above digital photograph was taken on a sunny day, almost no clouds in the sky. The objective was to get a clear view of the entire entrance to this amazing flower show. The Auto mode on your digital camera is ideally suited for such images. A tripod is not necessary in such cases.
Manual mode: This is one option on digital cameras that is not commonly used. However it is where your true creativity and power resides, so do not be afraid to experiment. Most digital cameras today imply, full manual mode when talking about manual so we will explain this first. In this mode you set the shutter speed and aperture on your own. These terms are explained below. Some digital camera models have a semi manual mode available too, this is quite interesting. The aperture preferred mode would imply a setting where, you choose the aperture and the camera automatically works out and sets shutter speed. Similarly the shutter preferred mode would allow you to fix the shutter speed, the camera automatically sets and decides on the aperture.

For these type of photographs, extreme detail is an essential element. This photograph was shot from around 50 feet away from the building. Small aperture (high aperture number), let the shutter speed be automatically set by your digital camera. If light conditions are not very conducive, the need for a tripod might be felt to overcome camera shake due to long long exposure time.
Aperture: Have you ever walked from a shaded room into the bright sunlight, most of us have done that. The sunlight hits your eye and you involuntarily squeeze your eyelids closer together. Why does this happen? Your eyes react to the bright light and your brain sends a signal to them. The signal is to reduce the amount of light that reaches the eye, this is done by bringing the eyelids closer together. An aperture in your digital camera does much the same thing. It controls the amount of light that is recorded in a photograph by, increasing or decreasing the size of a 'hole' called an aperture.
In photography this is referred to with an 'f' number. For some strange reason a larger f-number implies a smaller aperture (size opening) and vice versa. So an f3.5 would have a larger aperture opening as compared to an f16.
When an aperture is small like an f16 or even f32, the distance in the image that will be in focus will be larger. A large aperture like f3.5 will have a focus range that is much shallower. Everythig beyond that short range will appear out of focus.

A slow shutter speed can kill the details in such a photograph. This photograph was taken at an indoor exhibition. Room light was insufficient to take an image. If you set the flash on your digital camera off and rely on auto shoot mode, the camera will strike a balance between shutter speed and aperture. You will end up with an image that lacks sharpness and detail. Instead, move the digital camera to auto mode, set the flash to on and shoot. Do not get too close to the subject, this could cause the flash to 'wash out' detail with excess light.
Shutter speed: This feature also controls the light that passes through the lens and to the camera. If your shutter speed is 1/2 it means that the shutter will remain open for half a second. A number like 2 would mean two whole seconds, something that is not commonly used. A number like 1/30 is one thirtieth of a second which is way smaller than half a second.
Remember that the aperture is the opening that controls the amount of light that reaches the camera. The shutter speed defines how long the light will keep passing through the set aperture. A higher shutter speed implies a smaller time during which the shutter remains open. A slower shutter speed would allow light to pass for a longer time period.
There is one more reason why you would want to control the shutter speed. Let us presume that you wish to photograph your baby running in the garden. If you choose a slow shutter speed like 1/4 (one fourth of a second), it would be too long a speed to capture a clear image. Your baby would have walked around by then and the picture would blur with the motion. You could learn to judge this by experience but, start with a speed of around 1/60. If it is an outdoor scene on a very sunny afternoon a 1/125 shutter speed might be a better option. You could infact try both options and select the better image.
The flash: Even the simplest digital camera today comes with a flash included in the body. The flash lights up when the object being shot has insufficient light to light it up, this is in the Auto mode. Most cameras have a menu feature for the flash. This would allow you to ALWAYS flash the light when taking a photograph, or to NEVER use the flash when taking a photograph. When place in the AUTO mode, the camera reads the surrounding light and then fires the flash if required.

This image of the entire temple architecture was shot from a front angle, the sunlight almost at right angles to the point of shooting the photograph. The face of the temple seems to short of light, the side is well lit though. A slower shutter speed with smaller aperture size, would have got better detail on the front. But this could have over lit the sides and detail loss could result. From the shot on site, this is a good image an expert photo editor might work on the light adjustments though.
Let us presume that you are taking an image of a dog walking on the lawn, a few minutes before sunset. The flash should ideally fire in such a situation, after all not much light would fall on the object (the dog) after the sun has set. If you turn the flash off, in the menu the camera uses it's brain and is more likely to mess things up. Since the total amount of existing light is low, the camera will set the aperture and shutter speed to compensate for the insufficient light. It would need to keep the shutter open for a longer time, and have an aperture hole that is larger (small number = large aperture). In this situation, the slower shutter would most likely cause the dog image to appear blurred as it (the dog) would be moving around.

A snail about 3 inches big crawling on an old cement bench, the scene at a national park. Notice how the sharpness on the snail is contrasted by a rather blurd background towards the edge of the photograph. This is as shot by the digital camera and no light or color adjustments were done. Stood about 4 feet from the object when imaging it, flash would not have affected much as daylight was sufficient.
The flash lighting up can sometimes be a problem. A typical case is when you take close up photographs. An object is 10 inches away from the camera, the surrounding light is really not enough to give a well lit photograph. If you had the flash coming up, the object would be hit with too much light. Reflections, white blotches and invisible details can all result in in such a photograph. One option for you would be to move back a few feet, zoom in and then take the photograph. With the distance between the light from the flash and the object increasing, the intensity with which the light falls on the object will decrease.
The tripod: This is really not part of your digital camera, it is more of an accessory. However using certain settings on your digital camera could get you better results with a tripod. This is the three legged camera stand that you thought that only professionals used! You are photographing a piece of architecture, a 5 storey tall construction. The best way to get detail is to switch to the manual mode of your camera. Having done that, set the aperture to the largest number (smallest opening) next, set the shutter speed to around 1/30th of a second. Place the camera on a tripod and take the photograph. You might have to play + or - with the shutter speed by taking a few sample photographs. With a shutter speed of 1/30th of a second, it is quite likely that camera movement could blur the image, the tripod eliminates this problem.

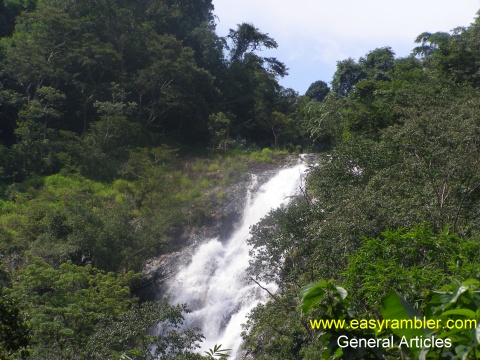
An outdoor scene with a hand held digital camera, in the Auto mode. A digital photograph where a tripod could have helped better the image composition and quality. Suggestion would be to use a tripod, switch to manual mode, set the aperture to the highest number (smallest size) and provide a slow shutter speed (longer exposure). The water would come like a smooth flow, almost like fine powder sailing from the hills. The background would remain in focus due to the tripod. However, this might not work out on a windy day when the trees and leaves are moving around.
Tripods come in various sizes and degrees of stability! Some tripods are so flimsy that even a stiff wind could topple them, something that would be a tragedy if your camera was mounted on the tripod at that moment. Table top tripods are also available, they can be useful when doing table top photography. We would recommend that your digital camera always be taken off the tripod when not in use. When you mount your camera on the tripod, make sure that the screw from below is firmly secured with the bottom of the camera.
We will now end this discussion on digital cameras here, more informative articles will be added soon. In the meantime have fun with digital imaging, it is much cheaper than playing around with film cameras that are always hungry for expensive films. Your digital camera will give you instant results, this makes the learning process more encouraging and enjoyable.
Send us your comments at easyrambler@rocketmail.com We will be glad to hear from you, also let us know if there is any specific topic on which you would like us to ramble!
Related resources: Good digital photography.
